Finishing curved edges

January 31, 2018 4 Comments

Finishing curved edges

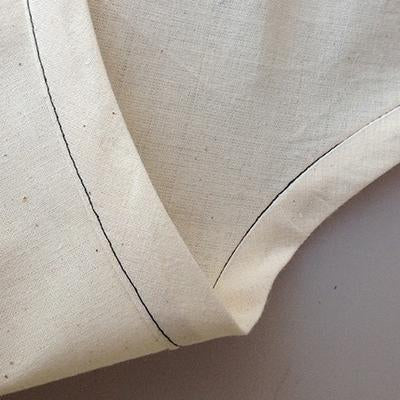
If you’ve ever had to hem a curved edge, you’ll know how tricky it is to turn, press and stitch it so that it looks neat and tidy. Curved edges are tricky for a few reasons. They involve a bias grainline, which causes the fabric to stretch out. Also, depending on the kind of curve you are working with, whether it be concave or convex, the fabric edge will be longer or shorter in length compared to the area it is being folded to, indicated by the red dashed line in the following diagram...


Concave and convex curve examples

In the instance of a concave curve where the fabric edge is shorter than the area it is folded to, the bias grainline will stretch, allowing you to manipulate the fabric. If it is a severe concave curve, you can clip the seam allowance to prevent puckering.

In the instance of a convex curve, the length of the fabric edge is longer than the area it is folding to, so you have to manipulate the fabric to make the lengths equal.

Here’s a tutorial for finishing curved edges.


Single Fold Hem

(I recommend that you finish the edge with a serge or zig-zag before starting. This demo is left unfinished so that you could see the stitches more clearly)


Basted edge of curved hemline

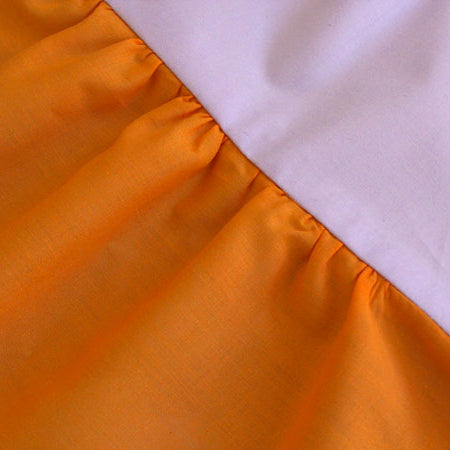
Sew a baste stitch 1/8” from the fabric edge, leaving a few inches of thread at one end.


    Examples of stitches on curved edge

Sew a second row of stitching at the intended seam allowance for the hem.


Gathering the curved edge

Pull on one of the thread tails from the stitch closest to the edge, drawing the fabric just enough so that the folded edge lays flat onto the fabric.


 Ironing the curved edge


    pressed curved edge, ready for hemming

Distribute the gathers evenly and press.

  Turn the fabric towards the wrong side, pressing along the second stitch line. This stitch acts as a folding guide and helps in achieving a crisp and even fold.


The topstitched curved hem

  Topstitch the hem within the seam allowance.
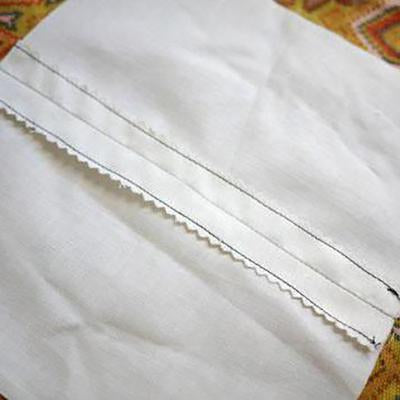
                                                                                                                                                                               

Double Fold Hem

    Stitch lines for double turned curved hem

    Sew a basting stitch ¼” away from the fabric edge. Sew a second-row ½” away from the fabric edge.


Ironing the first fold of the double turn hem

 Turning the fabric towards the wrong side, press along the first ¼” stitch line.


first press of double turn hem

This helps to create an even crisp line to fold along the stitch.


Pressing the second fold for the double fold hemSecond fold of double fold hem

Press again along the ½” stitch line

Press again along the ½” stitch line.


 finished double turned curved hem

Topstitch along the hem within the seam allowance.  Feel free to remove the stitching along the folded edge after the hem is complete.


YOU MAY LIKE:


4 Responses

Lilly
Lilly

January 11, 2022

This was such an awesome tutorial. Change my life… absolutely brilliant. What a huge time saver and beautiful finish.
———
Victory Patterns replied:
I’m so glad that the tutorial was helpful to you!

Oluwaseun
Oluwaseun

August 05, 2021

Your tutorial was helpful.

Adeline Harrison
Adeline Harrison

February 17, 2021

Thank you SO MUCH for this tutorial!! I went to school for apparel design and they never taught us this trick. This saved me a huge headache last night while I was doing alterations for someone and had three asymmetrical hemlines to take up!! Definitely going to check out more of your posts :)

Adeline Harrison
Adeline Harrison

February 17, 2021

Thank you SO MUCH for this tutorial!! I went to school for apparel design and they never taught us this trick. This saved me a huge headache last night while I was doing alterations for someone and had three asymmetrical hemlines to take up!! Definitely going to check out more of your posts :)

Leave a comment

Comments will be approved before showing up.


Also in Sewing Tutorials

How to stitch in the ditch

January 31, 2018 1 Comment

When it comes time to finish the inside edges of a garment, such as the inner edge of a waistband, cuff, collar, binding, etc, you can choose to secure the edge with a hand stitch or a machine stitch technique known as stitching in the ditch. This tidy stitch is fast compared to a hand sewn slip stitch and can save you a good bit of time.

View full article →

How to gather fabric

January 31, 2018

In this tutorial, you’ll learn how to sew a gather stitch, how to take up the gathers and finally, how to attach the gathered edge to a corresponding piece. This gathering method explains how to sew a gather stitch with three rows of basting, which is suitable for larger gathered edges or for full gathers. This tutorial is taken from the pages of Boundless Style. You can find this tutorial and many others in Boundless Style.

View full article →

Fancy Seams tutorial

January 31, 2018 1 Comment

The type of seam that choose to sew can not only make a garment look beautiful from the inside out, but they can also enhance the life of a garment, as well as your pride in what you've made. This little guide will give you a basic rundown on a few seam finishes starting with the basics, and then we'll get into the fancy stuff! I'll give you some pointers as to when to use each seam finish. When you make clothing with beautiful seams, you'll be so much happier wearing it!

View full article →