

Grading between sizes is an adjustment made to your pattern prior to cutting out your fabric. When you are various sizes throughout your body, this adjustment is going to allow you to customize your size.
On the Esther pants, if you are one size at the waist and a different size at the hip, when compared to the size chart for the pattern, this is a modification you'll want to make this adjustment to your pattern. This tutorial walks you through how to grade between sizes if you are larger at your waist than in your hip, or alternatively, larger at your hip than you are at the waist.
Example 1: Follow this demo if you are larger in the hip than you are in the waist.
Example 2: Follow this demo if you are larger in the waist than you are in the hip.
I’ll use size 10 for the waist and 8 for the hip in the demo.
(Skip past example 1 for this demo)
Notes:
We will make changes to pieces A, D, and E. All other pattern pieces will be traced or cut based on your waist size.
Whether you are cutting or tracing your pattern, I would advise that you draw the adjustments onto the pattern in pen or pencil first and once you are satisfied with the changes, proceed to cut or tracing the pattern.
Tools:
Marking tool
Ruler
Hip curve ruler
Example 1:
I’ll use size 8 for the waist and 12 for the hip in the demo.
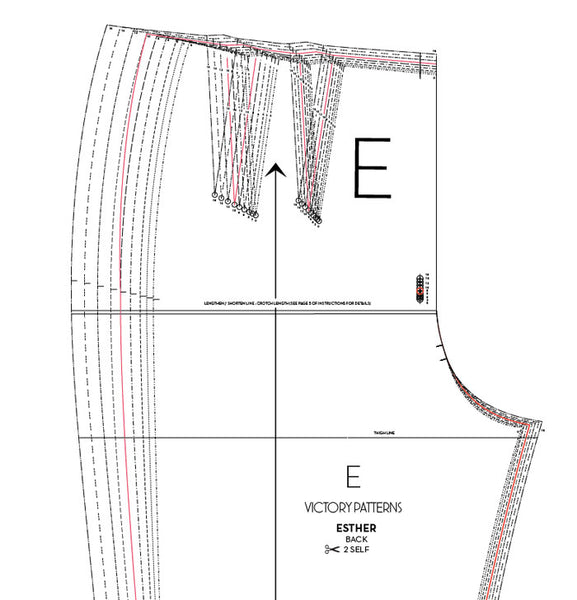
Piece E
Step 1: (figure 1)
- Trace the waist and darts along the size line for your waist size (8).
- At the side seam, use a curved ruler to connect your waist size (8) to your hip size (12).
With the ruler, meet the hip size line at the hip notch as shown in the image. - Below the hip, continue to trace your hip size (12) along the rest of the outseam.
- Use the zipper mark for your waist size (8).
- Use your waist size along the crotch curve and inseam.
*There are no changes necessary for Piece B, but it is worth mentioning that you should trace the crotch line and inseam based on your waist size.
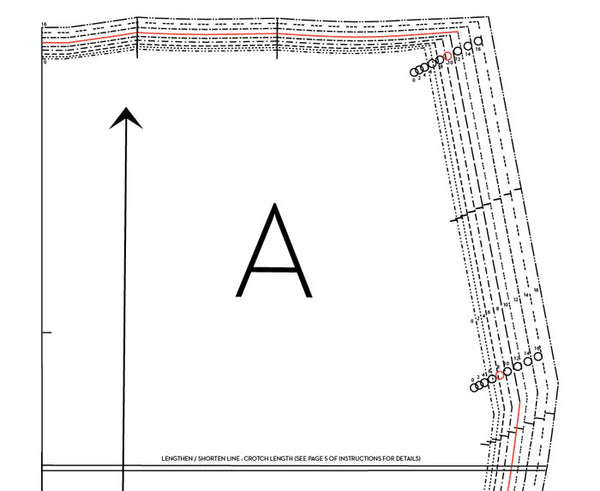
Piece A:
Step 1: (Figure 2)
- Trace the waist along the size line for your waist size (8).
- Near the waist edge, trace the match point for your waist size (8).
- Trace the outseam according to your hip size (12).
- Near the outseam edge, trace the match point for your hip size (12).
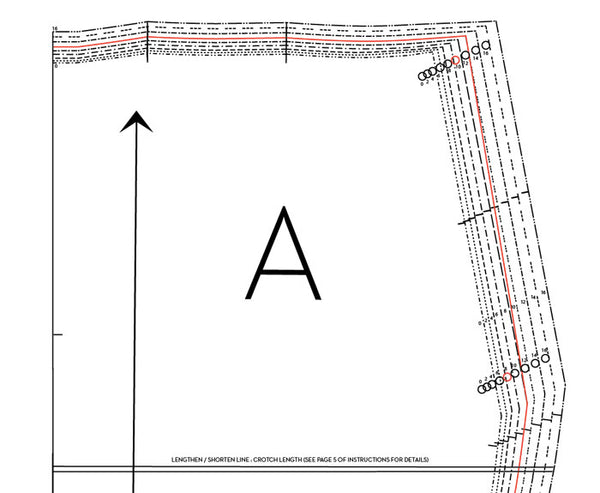
Step 2: (Figure 3)
- Connect the traced waist and hip sizes along the indicated diagonal edge
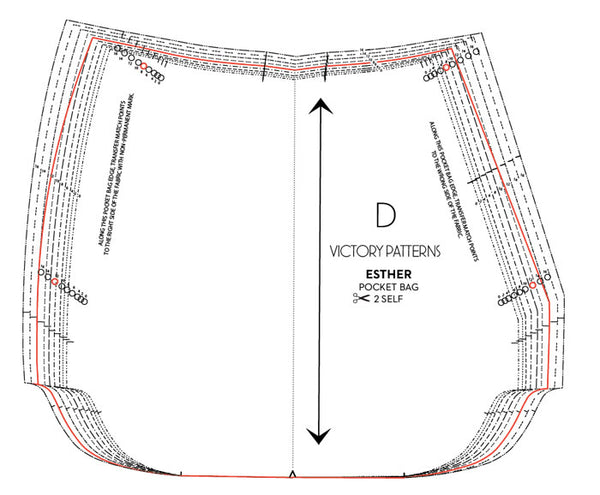
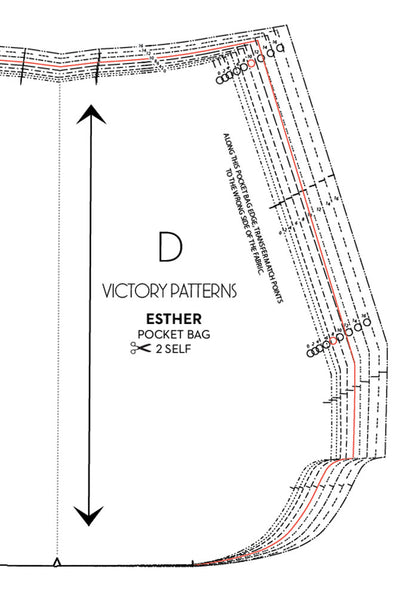
Piece D: Pocket Bag
Step 1: (Figure 4)
- On the side of the pocket back that corresponds to Piece A, make the same adjustments to this side of the Pocket Bag as you did with Piece A.

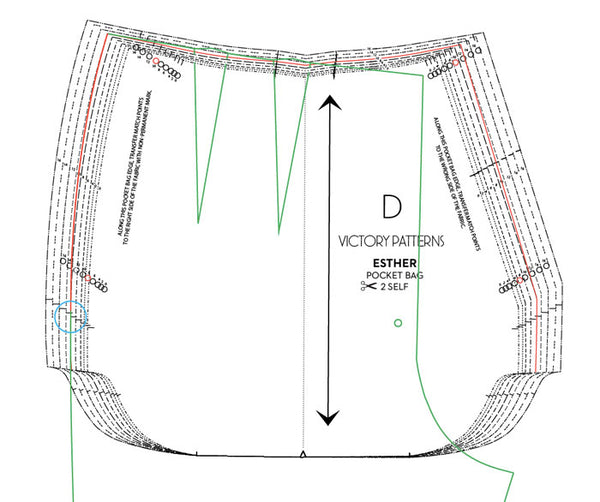
Step 2: (Figure 5)
- Align Piece E (Back) to the other corresponding side of the pocket bag (D). (In the diagram, Piece E is represented by a green outline.)
- Match Piece E (Back) and Piece E (Pocket Bag) at the waist/outseam intersection. Then, align the pieces at your hip size line (12).
- Use the adjusted side seam shaping that you've made to Piece E (Back) to assist you in creating your new line on this side of Piece D (Pocket Bag).
- Some of the changes we are making here will require the hip notch to be adjusted. If necessary, reposition the outseam hip notch, circled in blue, matching the hip notch from Piece E to the hip notch on Piece D.
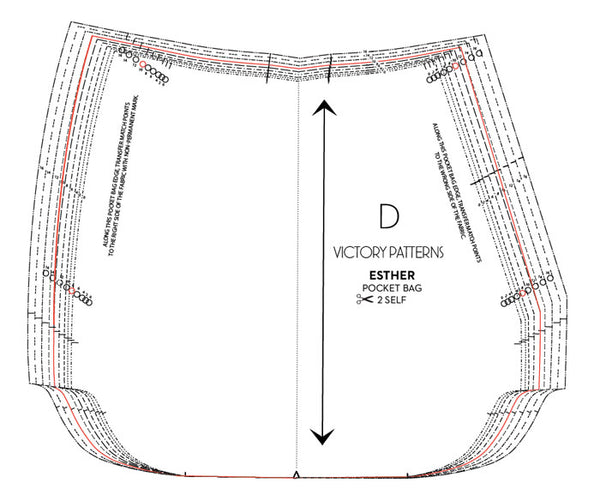
Step 3: (Figure 6)
- Trace the lower portion of the Pocket Bag (E) based on your hip size.
Example 2:
I’ll use size 10 for the waist and 8 for the hip in the demo.
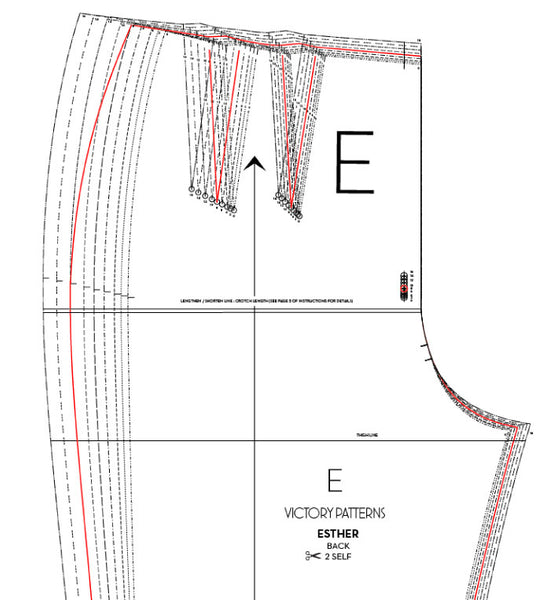
Piece E:
Step 1: (Figure 7)
- Trace the waist and darts along the size line for your waist size (8).
- At the side seam, use a curved ruler to connect your waist size (10) to your hip size (8). With the ruler, meet the hip size line at the hip notch as shown in the image.
- Below the hip, continue to trace your hip size (8) along the rest of the outseam.
- Use the zipper mark for your waist size (10).
- Use your waist size along the crotch curve and inseam.
*There are no changes necessary for Piece B, but it is worth mentioning that you should trace the crotch line and inseam based on your waist size.
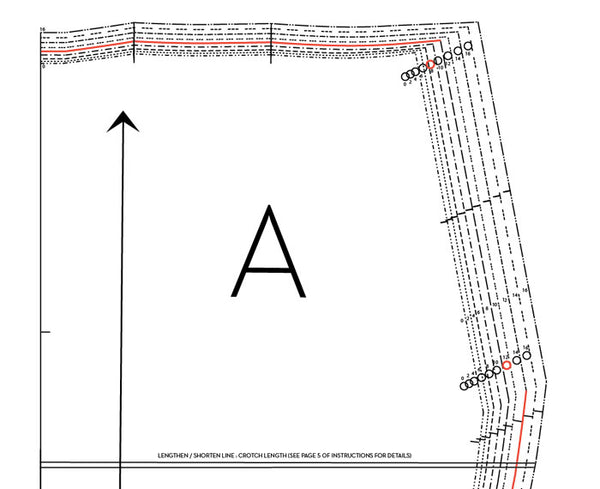
Piece A:
Step 1: (Figure 8)
- Trace the waist along the size line for your waist size (10).
- Near the waist edge, trace the match point for your waist size (10).
- Trace the outseam according to your hip size (8).
- Near the outseam edge, trace the match point for your hip size (8).
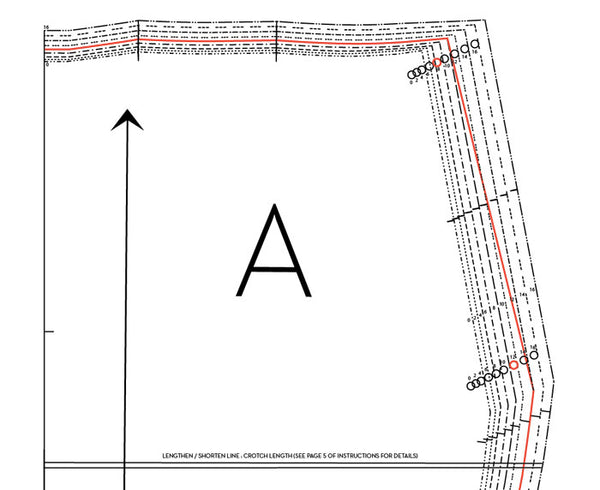
Step 2: (Figure 9)
- Connect the traced waist and hip sizes along the indicated diagonal edge.
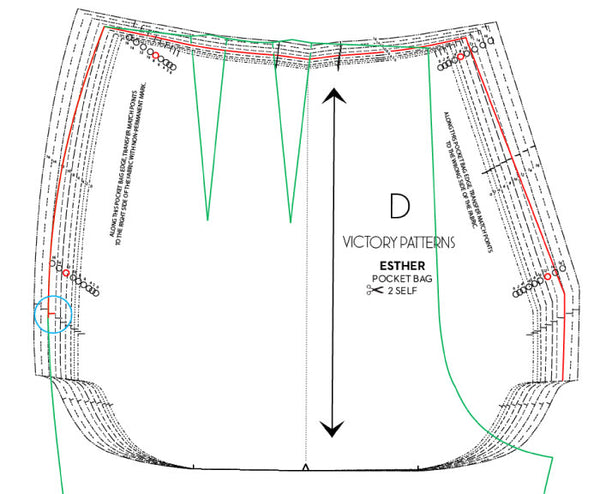
Piece D: Pocket Bag
Step 1: (Figure 10)
- On the side of the pocket back that corresponds to Piece A, make the same adjustments to this side of the Pocket Bag as you did with Piece A.
Step 2: (Figure 11)
- Align Piece E (Back) to the other corresponding side of the pocket bag (D). (In the diagram, Piece E is represented by a green outline.)
- Match Piece E (Back) and Piece E (Pocket Bag) at the waist/outseam intersection. Then, align the pieces at your hip size line (8).
- Use the adjusted side seam shaping that you've made to Piece E (Back) to assist you in creating your new line on this side of Piece D (Pocket Bag).
- Some of the changes we are making here will require the hip notch to be adjusted. If necessary, reposition the outseam hip notch, circled in blue, matching the hip notch from Piece E to the hip notch on Piece D.
Step 3: (Figure 12)
- Trace the lower portion of the Pocket Bag (E) based on your hip size.

Leave a comment