

Sloane features a fitted bodice with a princess seam, which is my favorite for fitting the bust area! Having a seam over the bust makes modifications to this area a pleasure.
In this tutorial, I'll show you how to create a full and small bust adjustment for this style. I'll show you the quick and dirty method for those of you who have just a little bit to add or take away, and I'll also walk you through the traditional approach to a bust adjustment for this style.
First, let's start by taking measurements.
- Wear a well-fitting bra while.
- Measure so that the tape is snug and make sure your fingers are not underneath the tape.
We'll take two measurements:
- Full bust
- High bust.
How to measure high bust:
Wrap the measuring tape around you, placing the tape underneath the shoulder blades. The tape should go as high as possible under your arms, and above the fullest part of the bust in the front.

How to measure full bust:
Wrap the measuring tape around you, measuring around the fullest part of the bust.

Sloane is designed for a B-cup capacity, meaning there is a 2" bust capacity in this bodice.
If you measured a 2" difference between your high and full bust, then you are a B-cup and shouldn't need any adjustments.
If the difference between these measurements less than two inches, you will need a small bust adjustment.
If the difference between these measurements is greater than two inches, you will need a full bust adjustment.
Here's a basic summary of cup sizes in when comes to making garments
(This may differ to the cup size you wear fro your bra).
1" difference = A cup
2" Difference = B cup
3" difference = C cup
4" difference = D cup
etc...
Selecting your bust size:
We want to make sure that the bodice fits along the high bust, and we will adjust the cup capacity to accommodate the difference.
The high bust in the pattern is 2" less than the full bust.
Here's a chart that outlines the Full and High bust measurements for each size
Select your bust size bast on your high bust size on this chart.
Chart 1: Full & High Bust
|
Size |
0 |
2 |
4 |
6 |
8 |
10 |
12 |
14 |
16 |
18 |
|
High Bust |
30" |
31" |
32" |
33.5" |
35" |
36.5" |
38.5" |
40.5" |
42.5" |
44.5" |
|
Full Bust |
32" |
33" |
34" |
35.5" |
37" |
38.5" |
40.5" |
42.5" |
44.5" |
46.5" |
Determining the amount to adjust:
Chart 2: Adjustment amounts
|
Difference between |
Amount to add/reduce |
|
1” |
Reduce by 1/4” |
|
3” |
Increase by 1/4” |
|
4” |
Increase by 1/2” |
|
5” |
Increase by 3/4” |
Tutorial Index:
The tutorials below appear in the following order:
- Small bust adjustment
- Full bust adjustment for a little bit of extra room (1/2" increase or less)
- Full bust adjustment for more room
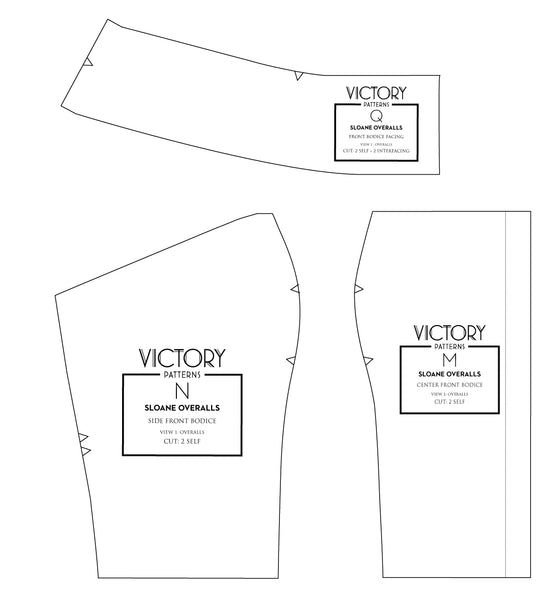
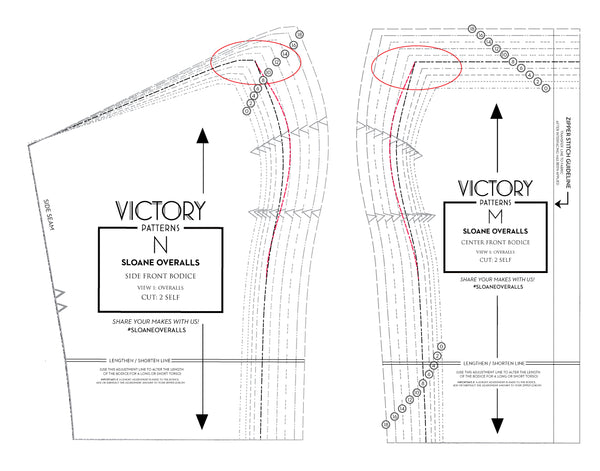
We will be using pieces N (Side Front Bodice) and M (Centre Front Bodice) for the bust adjustment. In case you need to make an adjustment to the upper edge of the bodice, keep piece Q on hand as well.
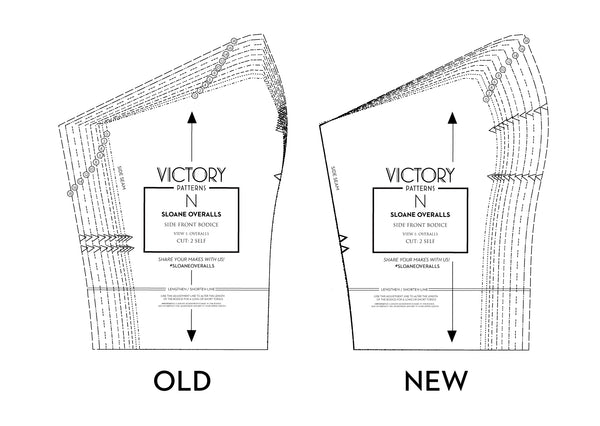
A little side note, I've updated the size nest layout for piece N to make it easier for adjusting the bust. If you've downloaded your Sloane pattern after Jan 22, 2020, your pattern has the modified piece included. For those of you who have downloaded a previous version of the pattern and would like the updated version of Piece N, you can download the update here.
There are no changes to the pattern. The update is only to the layout of the sizes. Below is an image of the old version and the new version, so you can see the difference between versions.
SMALL BUST ADJUSTMENT:
In all honesty, for this pattern, I would use a pin fitting method with a muslin of the bodice to determine my adjustments. When pin fitting, you'll have the opportunity to shape the seam to your curve, and also decide whether you need to adjust the high bust (bodice's upper edge).
This is where having a princess seam is excellent, as you can pin the bodice in along the seam until you get the desired fit.
I'll show you here how to adjust your pattern piece.
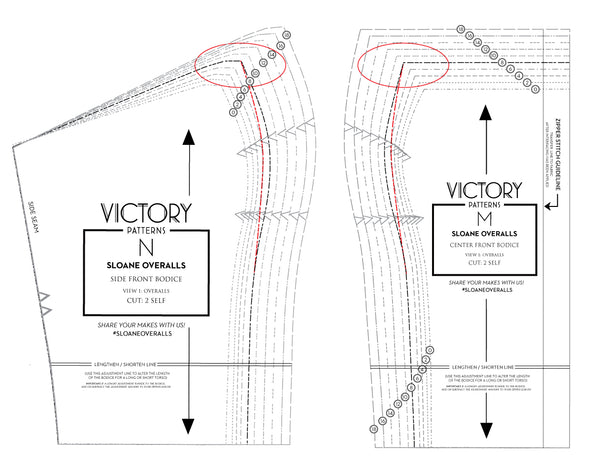
In this example, I'll trace size 8, and grade to size 6 at the bust. I'm going to maintain the high bust measurement, so I'll leave the upper edge bodice at size 8. I've circled that edge for clarity.
 Small bust adjustment
Let's say I decide in a pin fitting to reduce to the upper edge of the bodice a bit. Pin fitting will show precisely how much to take in, but for this example, I'll grade to size 6. I've circled that edge for clarity.
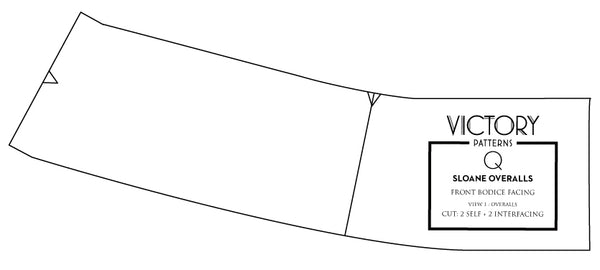
Because I've adjusted the upper edges of the bust, I've got to make a corresponding adjustment to piece Q. Take note of the difference between the original size (8), and your new graded size (6) along the bust edge. Let's say for this example, that it's 1/4" on piece N, and 1/4" on piece M, so 1/2" in total. See the next diagram for details.

Small bust adjustment with decreased high bust
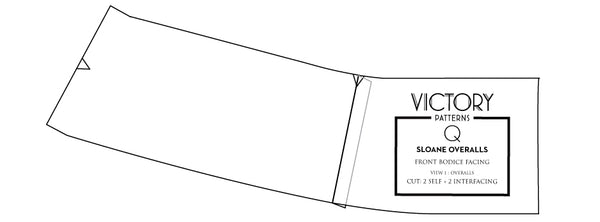
I've traced piece Q in size 8, since my bodice began as size 8.
At the notch along the upper edge of the facing, draw a straight line through the notch to the lower edge of the piece.
To either side of that line, draw the amount you're taking in along the upper bust edge. For example, there is 1/4" difference between size 6 and 8 on both piece M & N, so I'll mark 1/4" to either side of the line at the notch. (this makes up for the 1/4" on both M & N pieces, totalling 1/2").

Fold the marked lines together and mark the new notch at the line. Your Q piece is now adjusted for your bodice.
Full bust adjustment for just a little bit of extra room (1/2" or less):
In this example, I'll trace size 8, and grade to size 10 at the bust. I'm going to maintain the high bust measurement, so I'll leave the upper edge bodice at size 8. I've circled that edge for clarity.
Full bust adjustment - adding a little bit of room
Let's say I decide that I need a bit more room along the upper bodice edge. In this example, I'll continue the bust grade along the top bodice edge to 10 (circles here).
Because I've adjusted the upper edges of the bust, I've got to make a corresponding adjustment to piece Q. Take note of the difference between the original size (8), and your new graded size (10) along the bust edge. Let's say for this example, that it's 1/4" on piece N, and 1/4" on piece M, so 1/2" in total. See the next diagram for details. 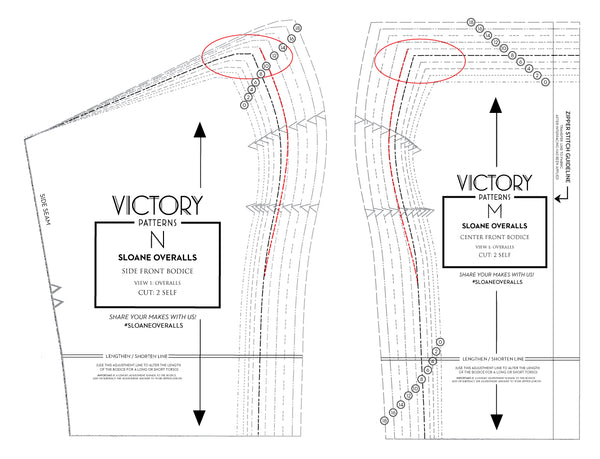
Full bust adjustment - adding a little bit of room and increasing upper bodice edge.
- I've traced piece Q in a size 8, since my bodice began as size 8.
- At the notch along the upper edge of the facing, draw a straight line through the notch to the lower edge of the piece.
- Cut along this line. Separate the two portions of the Facing so that they are 1/2" apart (or your total amount added to your bodice edge).
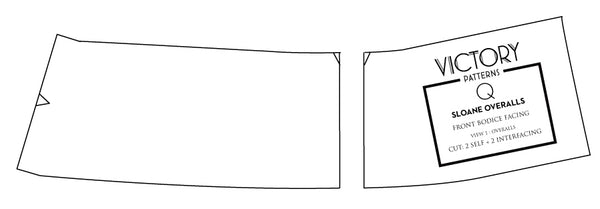
- Draw a line halfway in between the two edges. Mark the notch along this line, at the upper edge of the piece. Your Q piece is now adjusted to fit your bodice.
Full bust adjustment for more room:
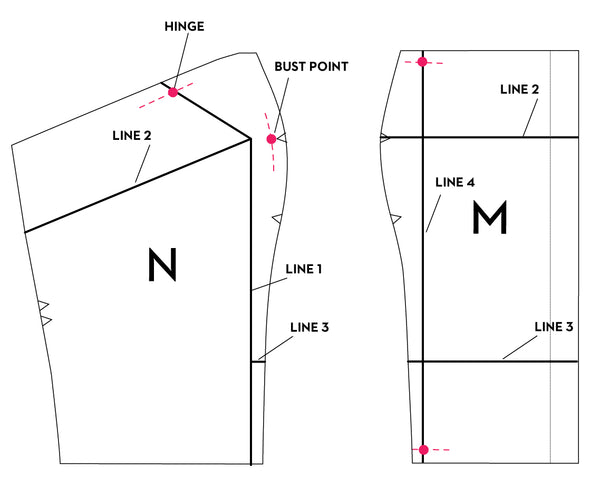
1: DRAW THE ALTERATION LINES ON THE PATTERN
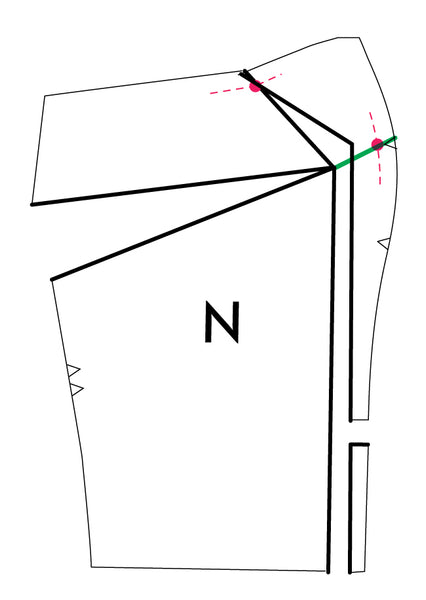
- SIDE FRONT BODICE (N): Mark the seam line & bust point: Mark the seam allowance 1/2" (2.5 cm) in from the edge alongside the upper notch. At this line, and alongside the notch, mark a dot indicating the bust point.
- Mark line 1: Starting from the lower edge of the piece, draw a straight line perpendicular with the waist, close to the princess edge. When you are in line with the bust point, continue the line towards the upper edge of the bodice, as indicated in the diagram below. Label line 1.
- Mark the seam line & hinge: At line 1 long the upper bodice edge, mark the seam allowance 3/8" (1 cm) in from the edge. At the intersection of the seam line and line 1, consider this your "hinge".
- Mark line 2: Beginning at line 1 along the bustline, then slanting slightly down towards the side edge.
- Draw line 3: Anywhere between line 1 and the lower notch along the princess edge.
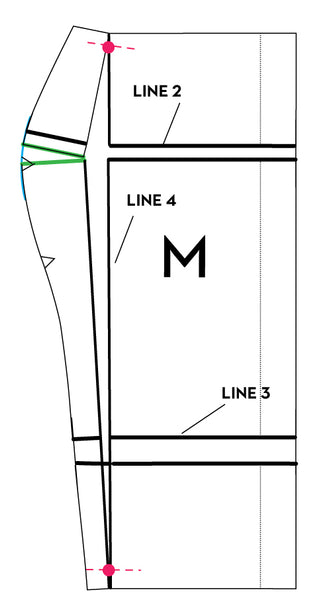
CENTER FRONT BODICE (M):
- Draw Line 2: At the upper bust notch, across the piece, perpendicular to the center front.
- Draw line 3: matching line 3 from the Side Front Bodice (N) piece.
- Draw line 4: Starting from the lower edge of the piece, draw a straight line, perpendicular with the waist, close to the princess edge.
- Line 4 hinges: Along the top edge of line 4, mark the seam line 3/8" from the edge. At the intersection of the line and the seam line, mark a dot indicating a hinge.
- Along the waist edge of line 4, mark the seam line 1/2" from the edge. At the intersection of the line and the seam line, mark a dot indicating a hinge.
ADJUSTMENTS:
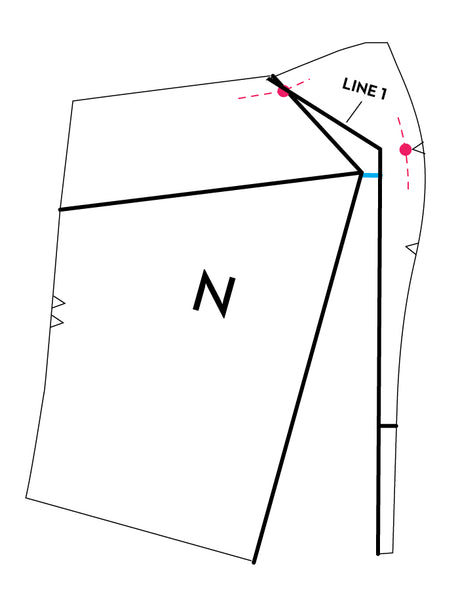
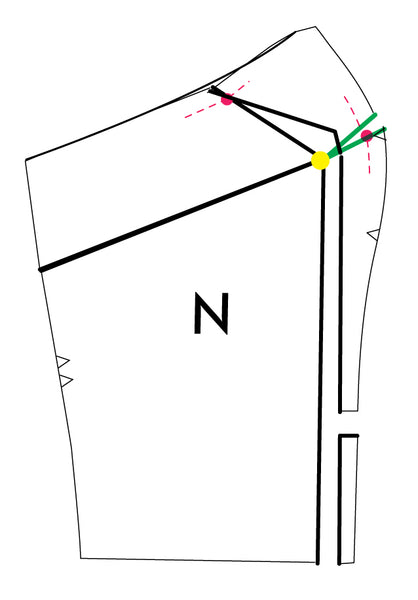
- Place the front portion of Piece N piece onto a sheet of paper and secure the upper portion of the piece with tape.
- Cut along line 1, cutting to but not through the hinge point. From the upper bodice edge, along Line 1, cut to but not through the hinge point.
- Swing the side portion of the pattern piece away, creating space between Line 1 edges. The space created in the location of the blue horizontal line should be equal to your adjustment amount (indicated in chart 2 above).
- Cut along line 2, cutting to but not through, line 1.
- Swing the lower the portion of the pattern below line 2 down, until the edges of line 1 are parallel.
- Secure this lower portion of the pattern to the paper.
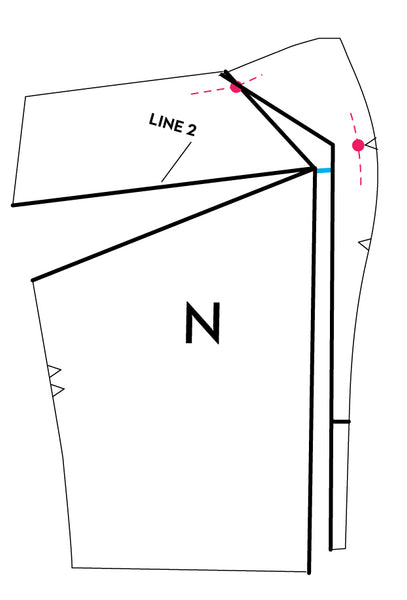
- Cut along line 3. Lower this small portion of the pattern down, so that it is level with the waistline of the corresponding side of the pattern. Make sure that the space between line 1 is maintained. Tape this pattern piece to the tissue.
- Draw a line from the point of line 1 through the bust point (indicated here by the green line).
- Cut the pattern along this line. (If you need to, remove the tape, securing the upper portion of the pattern to the paper).
- Cut the pattern along this green line; This will allow you to close the side "dart" that has been created along Line 2. Swing the upper portion of the pattern down (pivoting at the yellow point) so that the edges of Line 2 meet.
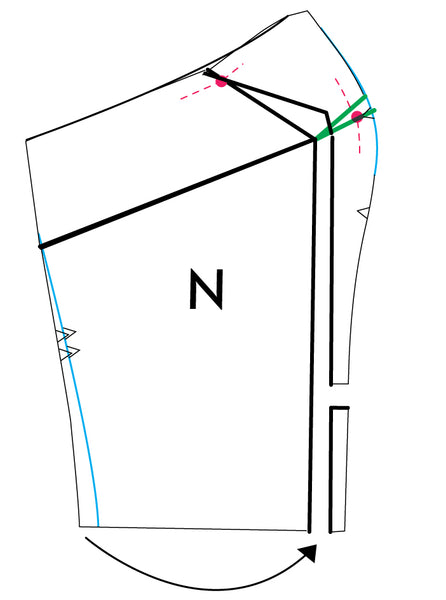
- Tape the upper edges of line 1 to the paper.
- Smooth out the princess edge.
- Since we have added fullness to in between Line 1, we need to reduce the side seam by the same amount, so that the bodice fits with the lower portion of the garment.
- Grade in by the same amount added at Line 1. Reposition the notches.
- On piece M, cut along line two and three
- Separate the sections of the pattern, creating spaces between these pieces equal two the corresponding spaces on piece B.
- Make sure to keep the center front edge parallel.
- Secure the sections of the pattern to the paper.
- Smooth out the side edge.
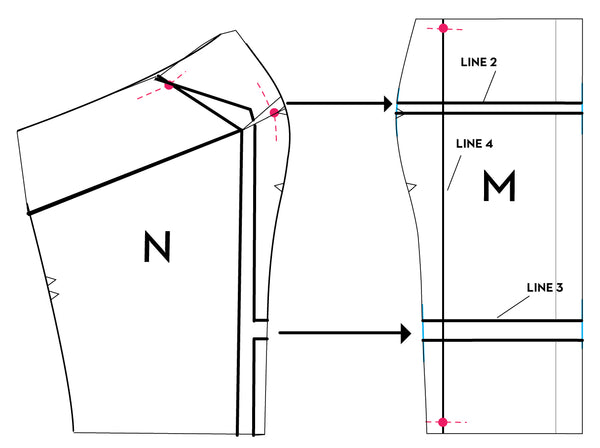
- Cut along Line 4, cutting to but not through the hinges.
- On line 4, from the seam allowance edge, cut in towards the hinges.
- On line 2, cut from the princes edge towards line 4. (this cut is indicated in green).
- With the two center front sections stabilized, pivot the upper portion of the piece (near the princess edge) away from the center front, creating space between line 2. The space created is the same as the adjustment made to piece N.
- Now, pivot the lower portion of the piece (near the princess edge) away from the center front, creating space between line two. The adjustment amount is equal to the upper portion of the pattern.
- Smoot out the bust line.
ADJUSTMENTS FOR PIECE Q:
Since we've made the adjustment to pieces M & N, you'll notice that the shaping along the upper edge of the pieces has changed. We need to re-create piece Q to correspond with this new shaping so that the pieces match when sewn together.
- Along pieces M & N, following the upper edge curve, draw a line 3" down from both edges (indicated in red). This line represents the lower edge of your facing.

- With a piece of tracing paper placed over pice M & N, trace out the upper bodice edge, the new line, and the side edges.
- On the "princess" edges, draw a line 1/2" in from the edge. This is represents your seam line (indicated in blue).

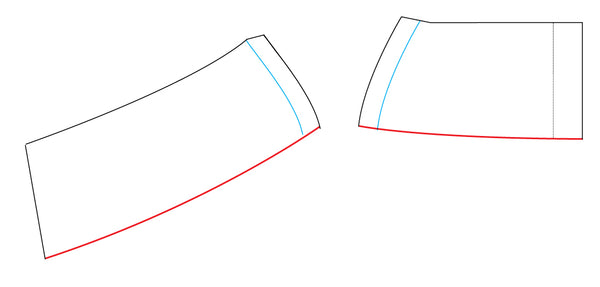
- To complete the new Front Facing piece (Q), align the princess edges. Match the princess edges, superimposing the blue lines (They will only align at the upper and lower edges, as the lines are curved).
- Along the top edge of the piece, where the seam lines originally connected, place the notch.
- Draw a line along the lower edge to smooth.

YOU MAY ALSO LIKE:

Leave a comment